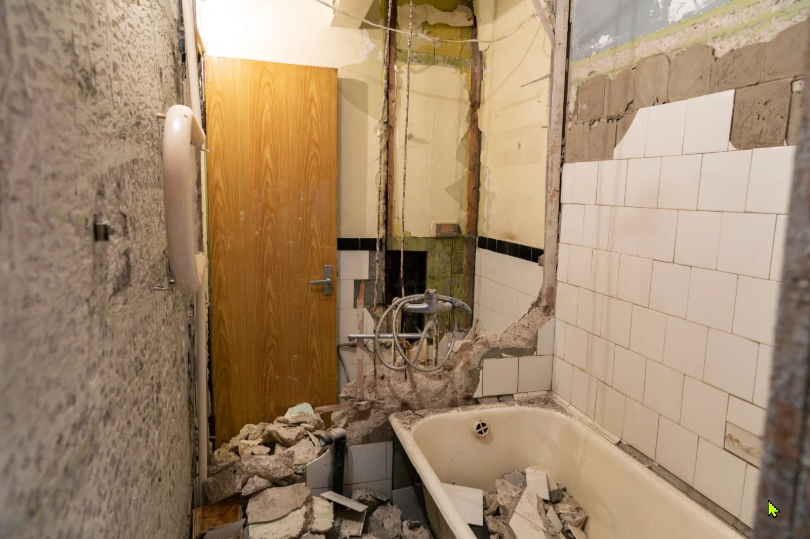
Bathroom demolition can seem like a daunting task. The idea of tearing down walls, removing fixtures, and dealing with plumbing or electrical systems may seem intimidating, but it’s also an essential part of a bathroom renovation. Whether you’re revamping a dated space or creating a new oasis, the demolition process sets the stage for a successful renovation. With a bit of planning and the right approach, you can make this part of the process smoother and more manageable. Here’s everything you need to know to guide you through a hassle-free bathroom demolition.
Planning Your Bathroom Demolition
Before you pick up a sledgehammer or start tearing out tiles, it’s important to have a plan. Bathroom demolition isn’t just about knocking down walls and removing fixtures; it’s about doing so in a safe and efficient way that sets the stage for your renovation.
Assessing Your Space
Begin by assessing the existing space. What parts of your bathroom need to be demolished? Are you planning to replace the bathtub and shower, or are you starting from scratch? Mapping out what needs to go will help you create a demolition plan that’s focused and organized.
Set Clear Goals
What do you want to accomplish with your demolition? Are you looking to open up the space, remove old fixtures, or maybe even reconfigure the layout? Setting clear goals for your renovation will help you know which elements of the bathroom need to be demolished.
Prepare a Budget
While bathroom demolition can be a DIY project for some, it can also be a costly endeavor depending on the complexity of the job. Prepare a budget that accounts for not only the demolition itself but also the disposal of debris, new materials, and any potential surprises that might arise.
Gather Your Tools and Equipment
Having the right tools is crucial for a smooth and efficient demolition. Without them, the task can become frustrating and time-consuming. Here’s a list of the most essential tools you’ll need to tackle the job:
- Sledgehammer: For removing walls, tiles, and even stubborn fixtures.
- Utility Knife: To cut drywall, caulking, and other materials.
- Crowbar: For prying up tiles and removing old plumbing fixtures.
- Pliers: Handy for removing small nails and other fasteners.
- Work Gloves: Protect your hands from sharp debris and jagged edges.
- Safety Glasses: Keep your eyes protected from flying dust and debris.
- Dust Mask or Respirator: Dust is an inevitable part of demolition, so protecting your lungs is crucial.
Preparing the Space for Demolition
The bathroom might be one of the smallest rooms in your home, but that doesn’t mean the demolition process will be quick or easy. Proper preparation is key to ensuring that you stay safe and minimize mess and damage during the process.
Turn Off Utilities
Before you start the demolition process, make sure to turn off all utilities in the bathroom. This includes water, gas, and electricity. Turning off the water supply will prevent accidents and water damage, especially when removing fixtures like sinks, bathtubs, and toilets.
Clear the Area
Take the time to clear the room of any personal items, toiletries, and smaller bathroom accessories. Removing any non-essentials from the room will make the space safer to work in and will help prevent damage to items you want to keep.
Cover the Floors and Remaining Fixtures
Protect your floors with plastic sheeting or old blankets to minimize the impact of falling debris. If there are fixtures you’re not removing, like a toilet or a vanity, make sure to cover them securely to protect them from any damage.
Start the Demolition Process
With your space cleared and your tools ready, it’s time to start demolishing! This process can be physically demanding, so take it slow and steady to ensure your safety and to prevent unnecessary damage.
Removing the Fixtures
Start by taking out any fixtures like the sink, shower, bathtub, or toilet. These will likely be your heaviest and most challenging items to remove. For sinks and toilets, you may need to detach the plumbing. Once the fixtures are free, you can carefully move them out of the way.
Tearing Down Walls and Tile
Once the fixtures are out of the way, it’s time to start tearing down walls and tiles. Use a sledgehammer or crowbar to break up tiles and drywall. Be mindful of any electrical wiring or plumbing pipes hidden behind the walls. If you’re unsure where these are located, proceed cautiously to avoid damaging them.
Removing the Flooring
After the walls are cleared, the next step is removing the flooring. Whether it’s tile, vinyl, or carpet, use your utility knife to cut through the material in manageable sections. Depending on the type of flooring, you may need a scraper to remove glue or adhesive beneath it.
Handling Plumbing and Electrical Systems
Bathroom renovations often involve plumbing and electrical work, especially if you’re relocating fixtures or making significant changes to the layout. If you have experience working with plumbing and electrical systems, you can handle these tasks yourself. If not, it’s best to call in a professional to ensure everything is done safely and up to code.
Disconnect Plumbing
Before you start moving or removing plumbing fixtures, make sure you’ve turned off the water supply. For sinks and toilets, disconnect the pipes using a wrench or pliers. If you’re removing a bathtub or shower, you may also need to disconnect the drain lines and water lines.
Handle Electrical Wiring Safely
If you plan to move lighting fixtures or outlets, be sure to turn off the electricity to the room entirely before you begin. Use a circuit tester to confirm that there’s no current running through the wires. If you’re unsure about handling electrical systems, it’s a good idea to consult a professional electrician to ensure everything is up to code.
Managing Debris and Disposal
Bathroom demolition generates a lot of debris—tiles, drywall, wood, and plumbing parts. Proper disposal is essential to avoid cluttering your property or violating local regulations.
Separate Recyclable Materials
Some materials from your demolition, like metal piping or certain tiles, may be recyclable. Set aside anything that can be repurposed or recycled to avoid adding unnecessary waste to the landfill.
Rent a Dumpster or Use a Junk Removal Service
For larger demolition projects, it’s wise to rent a dumpster to handle the debris. This will allow you to keep the site clean and organized as you work. Alternatively, you can hire a junk removal service to help haul away the materials once your demolition is complete.
Safety First: Protecting Yourself and Your Home
Demolition isn’t just about breaking things down—it’s also about ensuring you, your home, and your surroundings are protected.
Wear Protective Gear
Wear sturdy, closed-toe shoes, heavy-duty gloves, and safety goggles throughout the process. Even small debris can cause injuries, so take the proper precautions.
Work in Small Sections
Rather than tackling everything at once, work in small sections. This allows you to focus your energy and attention on specific tasks, making it easier to manage the demolition process and reduce the risk of injury.
Be Mindful of Asbestos and Lead
If your home was built before 1980, there’s a possibility that your bathroom contains asbestos or lead-based paint. If you suspect this, it’s best to have the area inspected by a professional before proceeding with demolition to avoid health risks.
The Final Steps: Preparing for Renovation
Once the demolition is complete, you’re left with a clean slate ready for your renovation. The next steps involve preparing the room for new construction and installation of fixtures, but also making sure that plumbing, electrical, and other systems are in good shape for the new setup.
Inspect the Space
Before moving forward, take a moment to inspect the space for any structural issues. Check the plumbing and electrical systems to ensure they’re ready for the new layout.
Prep the Walls and Floors
Now that the demolition is finished, it’s time to prep your walls and floors for new installation. This might involve patching up holes, smoothing out surfaces, or adding fresh drywall. Make sure everything is level and properly prepared for the installation of new fixtures, tiles, and finishes.
Preparing for a Safe and Efficient Bathroom Demolition
Before tearing into tiles or pulling out plumbing, planning is everything. Proper preparation means turning off utilities, protecting surrounding areas, and ensuring you have the right tools. Safety gear is essential—think gloves, goggles, and masks to handle dust and debris. Clearing out personal items and disconnecting water lines can help avoid unexpected damage. A careful start sets the tone for a smooth renovation.
Step-by-Step Breakdown of the Demolition Process
A bathroom demolition usually begins with removing fixtures like mirrors, cabinets, and vanities. Next, tiles are pried off, drywall is cut out, and plumbing or electrical components are carefully exposed. It’s not about swinging a sledgehammer wildly—precision matters. Carefully dismantling each layer preserves structural integrity and makes cleanup easier. Knowing what to remove—and how—helps you avoid costly mistakes during the renovation phase.
Conclusion
Bathroom demolition is a crucial step in any renovation project, but it doesn’t have to be overwhelming. By planning ahead, gathering the right tools, and taking necessary safety precautions, you can ensure a smooth and efficient process. Once the demolition is done, you’ll be well on your way to creating the bathroom of your dreams.
For professional assistance with junk removal and demolition, Clutter Ninjas Junk Removal in Magnolia can help. We handle the heavy lifting, so you don’t have to worry about the mess or the logistics. Whether you need a complete bathroom demolition or just help clearing out debris, we’re here to make your renovation process as stress-free as possible. Contact us today at 936-262-1999 or sborne@clutterninjas.com for more information.